Quilt in the Hoop: Planning my Project...and the Finished Project
In the last Quilt in the Hoop (QIH) post I added the "happiest" fabric from Connecting threads to my virtual stash. Now I want to do something with it! Off to plan my quilt layout in QIH!
The app opens to the My Quilts page. to begin a new quilt, I tapped the "+" in the upper right corner of the screen.


The app opens to the My Quilts page. to begin a new quilt, I tapped the "+" in the upper right corner of the screen.

The Quilt Editing page opens. By tapping the "Edit" toggle and then the "BLOCK 1" square, I can open the library of blocks available at this time. (I really cannot wait for more to be released!)

To find the perfect block I scroll through the images.

Found one! So, I tapped on the block (1). I can now choose to color the patches in the block as desired. Towards the bottom of the screen are the directions, "Select pieces for fabric choices." (2) By tapping on the desired patch I can choose my fabrics from the scroll bar at the bottom. The Connecting Threads fabrics I previously added can be found in the "From Fabric Stash" area. If it is purple, it is selected.

I scrolled through the swatches until I found the yellow swatch and tapped on it. I can even color several patches by tapping on their pieces (see the check mark?) and then scrolling until I find the correct fabric for those pieces.

I continued until I had the block colored as I desired.

Because I was going to use the same block throughout the quilted piece I tapped on the slider, "Use for all squares." I then selected DONE from the upper right of the screen.

Back to the QUILT EDITING page so that I can arrange my blocks! First, I tapped on the toggle ROTATE on the right side of the page. Now by tapping on each block I can rotate it 90 degrees.

With my blocks arranged to my satisfaction, this page is ready to help me finish this project and get quilting!
- I can name this quilt! Jury is still out on this one right now.
- This line contains the "vital statistics" of my project. First, I determine the size of my blocks: S (4.5"), M (6/5") or L (9"). Next, I set the width of my project and the height (or the number of blocks wide and/or high). I can see the approximate size of my project. Finally I can see the fabrics used and a preview of what I am doing! But, more about the last two later!
- I can even add up to 3 borders or sashing to my project by moving the slider to the right (when active I see purple!)

Adding my borders is easy!
- I moved the slider to the right. Three border selections visualized.
- Tapping each block, I am able to add the fabric of my choice for my first border.
- I selected the number above the fabric choice and adjusted the number to the desired width of my first border. I repeated steps 2 and 3 for each border I desired. For this quilt I added 2 borders.
- Wait! I cannot see my borders!?!? To the far right is the preview button for my quilt. Tap that....

I get a really good graphic representation of my project. I can also see where I made a layout mistake! (Can you find it?) Selecting DONE sends me back to the editing page to correct my oops!

Back at edit. Using the ROTATE toggle, I fixed my oops! Happy camper here! Immediately to the left of the FABRICS toggle (circled) I note the size of my project as 20 x 46". Great size for a runner...I'm ready to sew! But ow much fabric should I order? This app is so complete, that it calculates the amount of fabric needed for this project (not to include the backing). In order to find the amounts of fabric needed, tap the FABRICS toggle.

For each fabric, the app has given me an amount to purchase. Let me say, this amount is generous and I am pretty sure that this amount of fabric will yield leftovers in the end. By naming the fabrics as I did, I have a record of where to find this fabric and what line it is in. (See my post on adding fabric here.)

I decided to print my list for future reference.
- I tapped the "send" icon at the upper right side of the page.
- In the new dropdown, I selected print. Please note, I do have a printer connected to my iPad, so I chose the PRINT icon. but, as you can see, there are many ways to save this page of information. How about creating an Evernote file just for quilts?

Selecting DONE returns me to the EDIT page. This app has thought of everything! Select TEMPLATE from the EDIT page. Tap on one of the blocks of the quilt.

A new page opens with templates of all of the pieces of this block.

The video library includes great information regarding the use of these templates for piecing the blocks. I prefer to use strips in the pieces---I'll share that technique in the not too distant future!
There is much information on this page....so scroll, scroll, scroll!

Look what I found! The block layout with numbers corresponding to the template numbers! Sweet! And....it is the order of stitch! Not much easier in my book! But, there is more....

I can now see exactly which pieces are cut from which fabric! I selected the FABRICS toggle at the top of my page. A new page opens....

I now know exactly which piece is cut from which fabric! I do not know about you, but I've paid top dollar for quilt patterns with less information! Again, this can be printed, exported....my choice!
If I had my fabric I would be ready to sew these blocks....
There are several ways to send the stitch files to your machine, account, or USB. My choice is to send to my AcuDesign app.
First I select the SEW toggle and then the block that I wish to sew...

A new screen opens and I can select my method of choice....

I like my AcuDesign (AD)! I have had a problem with recognition of the AD app, but it is an easy fix...simply open the app and let it run in the background; problems solved. It is a great app, trust me!
So....off to order my fabric and get stitching!
UPDATE
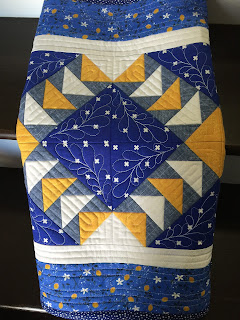
The holidays intervened. I ordered my fabric, and of course, had plenty! I finished the runner in a couple of days. I just love the way it turned out! The points are SOOOO exact! What do you think?


Off to plan another project! Thanks for joining me....Until next time keep sorting those scraps and generating those gems!


Very nice and helpful design helper.
ReplyDeleteProbably not as easy as you make it look.