Frugal Friday: Custom Colors and Papers
I am thrilled to be guest designer over on "She's a Sassy Lady Blog" once again! If you haven't checked it out, please do so. Sheila has great tutorials and an amazing set of guest designers.
I know that we have all been inspired by a single picture---not necessarily a photograph. yet, when the time comes to create the project there are no "perfect" paper matches. Today's Frugal Friday will finally put an end to that situation!
I just love this picture! It was a free download from The Vintage Workshop (they have great stuff!)
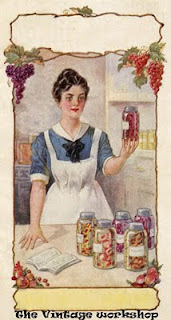
It just screamed to be used with my PC Preserves cartridge in something more than a card. When I finally decided on my project, I had no (none, nada, niente) coordinating papers in my stash---and of course it was very late at night. Thank goodness for my Photoshop Elements. (Keep in mind, any graphic program can do similar functions!)
The tools that I used in the program included:
- Open a background
- Setting the size of the background
- Using the "color picker"
- Using the flood fill
Open the Inspiration piece. Enlarge the background of the picture to 8 x 8". Flood fill the background with a color that coordinates.

Now the fun part! I will outline the process for one color, but it is simply repeated for each color that is desired.

Find the "color picker" tool for your program:

Zoom into the area of the picture for the color desired. Using the tool, click on the color. The selected color should appear as the primary color (color 1 or foreground color).

Open a new background. Set the size of the background at 6 x 6" (this is the size of 1/4 of the Cricut mat).
Fill the mat with the color.

Send to your home printer. Voila! Custom matched colors. I printed 5 colors; the greens I simply adjusted the light and dark of the color using the color bar of the program.

After printing, I trimmed the papers to 6 x 6" squares. I like to seal the printed pages with Krylon Preserve It for Photos; I get no bleeding or running of colors!

On to setting up the Gypsy to cut your fruits from Preserves!

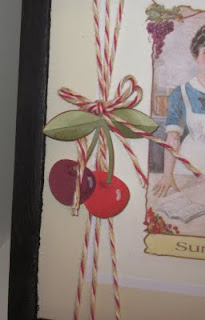
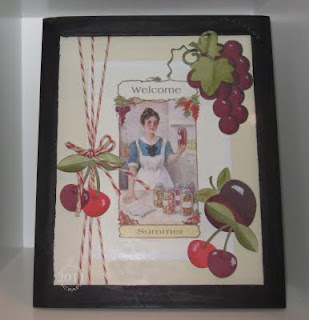
To finish, I purchased a 5 x 7" frame. Since the "mat" coordinated with my picture I framed it with the canning picture. I wrapped yarn (yup!) around the glass and the picture/mat.
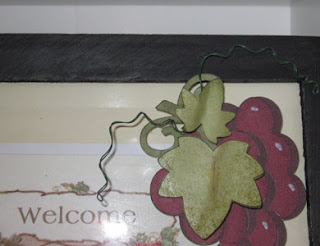
I then added the whole thing to the frame. I added some curls of green florist wire to the grapes to mimic tendrils.
Finally, I arranged the fruit on the glass around the picture. I adhered it all with pop-dots.


Comments
Post a Comment