Adventures in StitchArtist: Creating an Easter Bunny
The library of shapes in SA gives this program so much versatility. Add Pinterest and the sky is the limit! My granddaughter wanted an Easter bunny on a shirt and I could find none in my personal embroidery files. But, SA gives me shapes....so a search began!
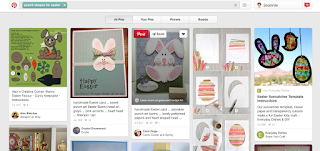
I have discovered that the more specific I am when searching, the greater the chance of finding what I want! In Pinterest, I typed in "punch shapes for Easter." Oh my! I got lost in the looking, but found so many cute ideas and all with basic shapes!


Using the left sidebar, there are several shape libraries.


 .
.


I have discovered that the more specific I am when searching, the greater the chance of finding what I want! In Pinterest, I typed in "punch shapes for Easter." Oh my! I got lost in the looking, but found so many cute ideas and all with basic shapes!

My granddaughter really like this one so I set out to make it happen:

The first step is to analyze the bunny's shape (that sounds a little ominous!)
What do you see? I saw 2 hearts, some circles and some straight lines.
Hmm...the bow is cute but adding a real bow would give some texture to the embroidery.
What do you see? I saw 2 hearts, some circles and some straight lines.
Hmm...the bow is cute but adding a real bow would give some texture to the embroidery.
Next I did a screen capture of the bunny pin.
I won't use it for digitizng,
but I will use it as a reference for the proportions as I add my own shapes to the design.
I won't use it for digitizng,
but I will use it as a reference for the proportions as I add my own shapes to the design.

In the StitchArtist3 embroidery window I selected IMAGE > my screen capture.
I then slid it to the side so I could reference it. I am ready to add my shapes!
From the toolbar I selected MERGE DESIGNS FROM LIBRARY.
In SA be sure that EMBRILLIANCE OUTLINES shows in the drop down menu.
In SA be sure that EMBRILLIANCE OUTLINES shows in the drop down menu.

Using the left sidebar, there are several shape libraries.
From the noted libraries I chose these shapes:
Hearts Folder: Heart 1
Shapes 1 Folder: circle and oval
Shapes 2 Folder: the egg

With all the shapes on my screen I am ready to play!
The first shape I chose to manipulate was the heart.
I needed to size it and mirror it!
I needed to size it and mirror it!
So, I changed to the CREATE menu (same toggle as CREATE DESIGN)

I used the corner handle and sized the heart to 3 5/16 wide and 3" tall.
(This may change, but it works for now!
With the heart selected I clicked on the MIRROR VERTICALLY (circled).
What will be the head is done!
(This may change, but it works for now!
With the heart selected I clicked on the MIRROR VERTICALLY (circled).
What will be the head is done!
Now for the ears!

Using the EGG shape, I sized it to 1 5/8 x 3".
(The picture to the side looks like the ears are close to the same height as the heart.)
(The picture to the side looks like the ears are close to the same height as the heart.)

Using the blue dot in the upper right corner of the design,
I rotated my "ear" as shown.
I now have two options:
create a second ear
or place the outline for the pink inner ear.
As I thought about it, I realized that if I created the pink "inner" ear at this point,
I could save myself multiple steps in the end.
I am all for saving time and work! So....
I rotated my "ear" as shown.
I now have two options:
create a second ear
or place the outline for the pink inner ear.
As I thought about it, I realized that if I created the pink "inner" ear at this point,
I could save myself multiple steps in the end.
I am all for saving time and work! So....
I copied the ear (CMD C on a Mac/CTRL C on a PC) the outer ear
and pasted it (CMD V/CTRL V).
When pasted, the shape lies over the original.
While in the CREATE OPTION
I made sure the pasted ear was selected and
I sized it using the black handles to 1 1/4 x 1 3/4.
and pasted it (CMD V/CTRL V).
When pasted, the shape lies over the original.
While in the CREATE OPTION
I made sure the pasted ear was selected and
I sized it using the black handles to 1 1/4 x 1 3/4.

Don't worry! I will be giving this little guy a second ear soon!
But first, a nose and a pink cheek.
The nose....remember that circle?
I pulled it down to the approximate location
and sized it as indicated: 11/16" x 11/16".

For the cheek: I copied the nose, pasted and sized it to 3/4" x 3/4."

I think I'm ready to add stitches.....
Change to the CREATE DESIGN page
With the drawn object, SA allows me to create what I want.
How I love that!
For my granddaughter's shirt I want an embroidered design, not applique.
However, This bunny would be really cute as an applique!
By saving the working (BE file) and the stitch file I can have the best of both worlds.
Pretty cool!
For now, I will fill this bunny with stitches!
Before I begin to lay my fills...I checked out the object menu.

I could not figure out what was what based on the names of the objects.
So, I changed their names by double clicking on the object
and typing the new name in the box (after identifying the part, that is!)

Now I can select the exact object I choose.
Oh by the way, I don't remember why I brought in an oval
but it can be deleted in the end!
On to adding stitches.
I know! He looks a little lopsided.
Trust me -- that is just for now!

For the next few steps I used the fill option from the stitch menu:

First, I selected the inverted heart outline,
I then clicked on the FILL STITCH.

My stitch of choice is TATAMI, at the default density and length.

My plan is to stitch this on a stabilized fabric.
So, I decreased the amount of underlay stitching this design would use.
I chose to use only PERPENDICULAR at a density of 26PT.

I also desired to tie my object at the entry and exit.

I repeated the same steps for the outside ear (the larger oval) using the same settings.
Right now this ear lies on top of the head, but that is okay. It will change.
My changes were getting a little tough to see...so I changed colors.
Now to create the inner ear.

I selected the inner ear and applied the TATAMI at the above settings.
What I am hoping for is a light, slightly transparent pink inner ear.
A couple of things occurred to me:
this inner ear lies on top of other stitches
and
the more transparent look will let the underlay show through.
There is really no need for underaly---
so I decided to remove all underlay.

Now to tie off the segment:

But I wanted the inner ear to look fuzzy. So, I chose to use the FEATHER the FILL toggle.

My settings are strictly personal preference!
But I love the look!

The next thing is to remove that pesky line running down the middle of the pink part!
Thinking this through...
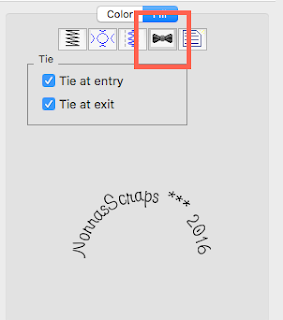
The GREEN bowtie is the beginning of the stitching;
the RED is the end.
This object begins at the GREEN,
stitches the fill
and then travels back to the RED to end the fill.

There is no real need to return to the start;
I hovered my mouse until the RED bowtie appeared next to my cursor,
grabbed it and slid it into position opposite.

I use the same steps to fill the rabbit's cheek.
In the end,
I decided to rotate the cheek
(using the blue dot in the upper right corner)
so that the inclination of the stitches was about 45 degrees (note the red arrow).

Now the nose....Again the fill with no underlay, but adding ties to beginning and end.
He needed a nose!
Again using the fill, I adjusted the stitch properties as indicated.
 |
One of my favorite SA3 features is the add outline:

This outline will give the perfect pop to the bunny's nose! So,
with the nose selected I clicked on this tool.
Here's what I have so far...

I decided that it was time to give this guy two ears and two cheeks.
Copy and paste, my heroes!
I return to the CREATE menu, it just seems easier for me!

From the OBJECTS menu, I click on and select the objects to duplicate:
the outer ear, the inner ear and the cheek.

With these objects selected, Copy (CMD C on a MAC or CTRL C on a PC)
Then, paste (CMD V/ CTRL V)
or from the EDIT MENU:

Again, the objects paste on top of themselves.
In the OBJECTS menu, the pasted objects are the last 3 items in the list.

Do not deselect these objects, yet!
From the TOOLBAR:
Select FLIP HORIZONTALLY.
The ear parts and the cheek should flip in place....

and grab them and slide them into position!
This is exciting...it is looking more like a bunny!
Back to the CREATE DESIGN to do a little clean up and add eyes.
Remember the oval....time to get rid of it!
 .
.
Select and delete.
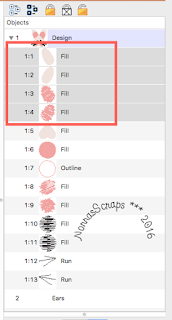
Now to reorder the objects.
Love how the software numbers the order of stitching...
1:1 stitches first, 1:2, 1:3, ending with 1:9.

I want the ear parts to stitch behind the face.
To do that, I selected the inner and outer ears and moved them into position.
Here is my final ordering:

I ran the design through the stitch simulator to check

I also wanted to make the entry and exit points to stitch more efficiently.
I chose the OBJECTS that I wanted to include.
Then, I selected MENU: CREATE> AUTO ENTRY AND EXIT.

Done! On to the eyes.
Oh no! I had not created an outline for the eye!
Back into the SHAPES 1 LIBRARY to get a circle.
I then sized it wayyyyy down to 1/4."

Using FILL, I adjusted the length of the stitches
and changed the color to black.
Again COPY and PASTE, for two eyes.
Select both eyes
and back to the CREATE menu to align them!

Select: ALIGN AND DISTRIBUTE.
From the drop down window: BOTTOM>APPLY.
The eyes snap into alignment!

No self-respecting bunny would be without whiskers!
I think that the easiest way is just to add a few
runnng stitch lines.
With these tools selected I went to town.

I inserted the points in the numerical order shown.
One line with tie off at beginning and end.
I copied and pasted the whiskers to the other side.
Again, I used the align function and aligned the top of the whiskers.

Almost there....now stitch this guy out!
I saved him as both BE and JEF files.
By maintaining the BE file I have a way
to fix any boo-boos that I find during stitching.
I sent Mr. Bunny to the machine....uh oh.

I had expected the stitches from the red line down
to disappear as overlap when I saved my design.
But they were clearly there.
I took 5 to rethink:
I have Enthusiast, Essentials, and SA 3.
It works for my applique, why not here?
Back to the Embrilliance Quick Tip 3 on removing hidden stitches.
A single word jumped out at me....DESIGN.
Suddenly, it occurred to me that Enthusiast and Essentials
do not work
with OBJECTS, but with COMPLETED DESIGNS.
To remove stitches I needed to change the objects of the one design
into designs in their own right.
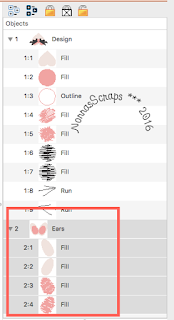
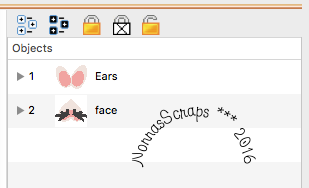
At this time, my bunny is one single DESIGN.
To have the stitches removed,
I needed to create a second DESIGN containing the inner and outer ears!

From the menu I chose CREATE> DESIGN> BEGIN NEW DESIGN.

At the bottom of the OBJECTS menu
a number 2 and a blank line appears.
I named this EARS since that is what I will put into this DESIGN.

I selected the 4 objects making up the ears.

I dragged the 4 OBJECTS
to the new DESIGN 2.
When the line highlighted,
I dropped them into the DESIGN2.

I then reordered the two designs so that the ears would stitch first
and the face second.
Keeping my fingers crossed, I clicked on the
REMOVE HIDDEN STITCHES
preview.

Voila! It worked!
I am so excited to know this trick;
so many possibilities!
Just to stitch....

Added some text from Jolson's....Love it!
And the best part! With StitchArtist I am not limited to a stitched design.
By simply returning to the OUTLINE status (in the BE file) I can reassign
whatever stitches I choose, perhaps an applique?
What do you think?

In the end I made a few adjustments to the density and
the feathered edge. These were totally personal taste.
I HIGHLY recommend doing a stitch-out prior to the final product...
just in case!
I have so enjoyed sharing this little adventure with you!
Until next time....


I love that you used a search for paper shapes made with punches-- very clever!! And also clever to forgo the underlay on the ears/cheeks! Love the end result! And you freaking brilliant lady!! You figured out the deal with making the remove hidden stitches work (or not) with SA!!! OK, I will remember to make the objects separate designs (or not depending)! Thank you!!! That had been a mystery to me that was getting under my skin! When you had it work for your applique previously, I didn't know what to think because it didn't work on my filled items. Now I know!
ReplyDeleteNadia you hit the nail on the head. great tips.
DeleteJeannie, I love your blog and you explain so well and Wow this is great. Thanks for sharing and helping all of us! You really are a gem.
ReplyDeleteGreat, thorough tutorial. I love that you covered so many skills. Great job!
ReplyDelete