Stitch Artist Adventures: First Efforts With Applique--Decision, Design and Export as SVG
I am slowly but surely playing with the amazing features of StitchArtist 3. This week I wanted to create an applique and share my adventure with you. And what an adventure it has been!
I have to admit, I am not new to machine embroidery nor applique. In some ways that is a hindrance!
For example, I do not like to start with basics---no circles or squares with names for me! When I opened the SA library I realized that I could borrow a technique from paper crafting and use different shapes for my applique! And the adventure began.
First, I did a "Google" search on punch art. Wow! Too many ideas! Overload!


I selected MENU> CREATE > BEGIN NEW DESIGN.


I have to admit, I am not new to machine embroidery nor applique. In some ways that is a hindrance!
For example, I do not like to start with basics---no circles or squares with names for me! When I opened the SA library I realized that I could borrow a technique from paper crafting and use different shapes for my applique! And the adventure began.
First, I did a "Google" search on punch art. Wow! Too many ideas! Overload!

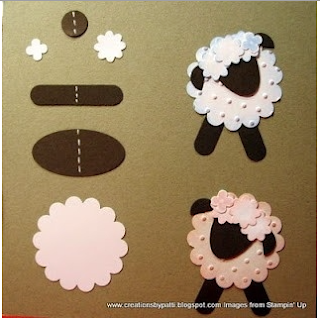
Some of the images had the shapes that I would need to recreate, like this little lamb....

Others just took a little imagination to see the shapes in the finished product. I finally decided on this little fish. Hmmm....looks like a heart for the fins, circle for the body and eyes and a crescent for the tummy. Size won't really matter because it's going to be my fish in the end! I took a screen capture of the little guys, just so I wouldn't forget their cuteness and it was off to SA 3!

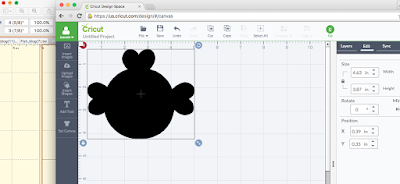
I opened the SA and selected the CREATE toggle (#!). I then imported my IMAGE onto the page (#2) I grabbed the green block in the center of the image and moved it outside of my hoop. I will not be using the photo for digitizing, just for reference.

From the toolbar, I selected LIBRARY: EMBRILLIANCE OUTLINES (of shapes)--I know the perfect ones will be waiting!

From the HEARTS library, I chose the heart that I liked the best and brought it onto my page. I returned to the LIBRARY and selected the circle from SHAPES 1.
These two shapes are basic to my design, so I will move them outside of my hoop. They are listed under objects 1; to make sure I know what is the basic I double clicked on the name and typed "Basics" in the box. No, I will have no doubt as to which shapes I have selected. If my design called for more, they would all be contained under OBJECT 1: Basics.

The objects in the "Basics" will not be used themselves, they are simply for copy and paste. If something were to go wrong in the final product, you've saved yourself some effort by not having to locate the shapes again!
In the creation of an applique, it is important to know which part to lay onto the background fabric first. Perhaps the easiest way to think about it the objects that are furthest from your hand if you were to try and touch the object will be first on the background. In this case, the fins should be first, but I want to create one more shape...the fish's tummy!
Please understand, my technique may not be exact. But it makes sense to me! In my mind, it is just easier to place all of the design objects in the correct order in the end by digitizing in this way, now.

This new design is going to contain the elements of the fish's belly.

I highlighted OBJECT 2 and renamed it "Belly"

Next, I copied and pasted two circles into the OBJECTS2: BELLY from my "Basics". 

Looking at the belly of the fish in the image I placed one circle on top of the other. I selected both circles.

From the tool bar, I clicked on the CREATE toggle to turn it off. I selected
ALIGN AND DISTRIBUTE. A new window opened and I chose ALIGN > LEFT > APPLY.
Back to the CREATE feature!
The next step truly was trial and error. I wanted to make an elipse for the belly of the fish; that is why I overlapped the circles. So....after many attempts...and many undos....

With both objects selected I went to the PATH toolbar and chose RECREATE. It is easiest to see the new shape under OBJECTS 2: Belly. Now I can delete the lower circle!

The easiest way is by selecting the object from the objects window! Once select (and double checked onscreen---delete!

Drawing of belly complete! On to the fins!
Again:
MENU> CREATE > BEGIN NEW DESIGN.
Double click on the OBJECTS pane that is new and name it "Fins."
Copy the heart in the "Basics" and past it 3 times into "Fins."

When all was said an done, I deleted two of the hearts and resized the one to my liking. I then copied and pasted to more into position, rotating as necessary.

Uh oh!!!! I discovered that when I cut and pasted my two additional hearts onto the page I ended up with 2 additional OBJECT lines named fins. I guess I could leave them.....

But why? What else can SA do?

Select all three of the "Fins". From the menu select CREATE > DESIGN > COMBINE DESIGNS.
And....voila!

The drawing of the fish is now complete. It is time to assign stitches!
For each object I selected the APPLIQUE stitch from the STITCH TOOLS.

The settings I used were the following:

NOTE:
I do plan on using my Cricut Explore to cut this fabric. However, until I am happy with the size of the design I will not select PRE-CUT or PREVENT USER CHANGES. I learned this the hard way!
And I learned something else...the hard way, please read to the end!
When I finished setting my stitches this is what I saw: 

Oops! Fins need to go behind the belly! But because I have the parts of my design arranged as I do, this fix is easy!

Select the OBJECTS: Fins. Drag it above Belly until you see a blue line appear. Drop it there.

Much better! Now to assign colors so that the parts will stitch appropriately! Save both the working file and the embroidery file!

Move from the CREATE area to the SIZING. When I have my
applique sized as desired, I take a screen capture. The circled width and length is
VERY important in Cricut Design Space when importing an SVG.
I completed the design by adding merging a design file I had previously created called "Eyes" and adding some bubbles.

Time to save the SVG file....

1. Select the first Applique Position (it is the running stitch).
2. A new window opens. Select APPLIQUE.
3. Select the words SAVE ALL.
A new window opens.
4. Name the file and select SAVE
There you have an SVG file for a digital cutter! Be forwarded if you use a Cricut---it imports BIG! The screen shot with measurements done above will be your very best friend!
In the design process, what would I have done differently? I learned at the very end it is important to size your applique outline before adding the stitches. I was unable to go back and add PRE-CUT or PREVENT USER CHANGES without redoing all of the stitches, colors, etc.
On to cutting the pieces!
I imported the SVG into Cricut Design Space per manufacturer's instructions.

But, Oh my!
It was HUGE! Not the size indicated in my screen capture.

I opened the screen capture with measurements and selected the edit tab in DS. With a little help from my calculator, I adjusted the sizing of the SVG.

I then colored the sections so that I could cut the parts from the correct fabric.

Ready to cut!
I applied Steam a Seam lite to the fabric, removed the paper and placed the iron-on against the cutting mat. I then used the default fabric setting.

My sweet Explore makes this so very simple and very precise!

Finally ready to sew! I love my MC 15000! I use the iPad app, Acudesign with Dropbox to wirelessly transfer the stitch file to my machine.

There he is! Hoop and foot selected....Uh oh...I forgot to sort colors! Oh well, next time!

I stitched the little guy by the color changes on my machine...first was the placement stitches for one of the fins (remember, I forgot to color sort :-()
It is really exciting to place the cut fabric and have it fit perfectly within the placement stitches.

After placing the fabric, I removed the hoop from the machine, taking care not to dislodge the upper hoop or the fabric. I then used my mini-iron to heat set the fusible web. Gotta be careful to not touch the plastic hoop!

Worked my way through the color changes! Here he is:

I love him! And I think I'm loving my Stitch Artist Software!
I've been asked to talk about the eyes; that I'll save for another day!
Until next time,


You are a great blogger and a great teacher. Thanks every so much. Look forward to blogging about how you did the eyes. GREAT WORK
ReplyDeleteWell, I am so glad you did this tutorial! I learned several brand new things to me. The 're-create object where overlapped' path button was brand new to me! Also an epiphany was that you can change the name in the objects pane!! I had no idea. And I am impressed that you were able to cut your svg with your Explore. I used to be able to because it used to import at native size. Something changed and it stopped doing that. The inflation was messing me up but seeing that you didn't use inflation at all is interesting! I ended up getting a Silhouette because I was hung up on that! I have questions but I will ask you on your FB post so that the answer will be easier to find! Thank you so much for taking the time to do this and for doing it in a systematic way! So easy to follow and to try a few steps to make sure I understood. (Yes, I had to try that path button!)
ReplyDeleteYour tutorial is great. I was able to duplicate the steps in making the eyes. It's so easy when you do it! Thanks for sharing your skills.
ReplyDelete