Adventures in Stitch Artist: Using an SVG for Applique
As a paper crafter, I have a very large collection of SVG images. I have a number that I return to over and over again---they just make me happy. And, I am even happier since Stitch Artist 2 and 3 allow me to "upscale" these images to machiine embroidery and applique!
One of my favorite SVG images for spring is this umberella from Lettering Delights' Garden Showers Collection:
Join me as I re-create this file for applique...
In StitchArtist, I selected CREATE > VECTOR.
A new window appeared, allowing me to navigate to the SVG file that I wanted to use.
Hint: at first I could not select my SVG files--they appeared in a light gray. Duh! I had not selected VECTOR in CREATE! Starting over, selecting VECTOR allowed me access to my SVG files.
So, I selected FILE > OPEN.
Ta da! My umbrella is now in my hoop as a set of lines, ready for me to designate the stitches.
And the OBJECTS menu shows three distinct objects to this design.
The Embrilliance manual gives fantastic advice about using VECTOR images for digitizing. Read and heed! Not all SVGs are as easy to use as this one....experience speaks here! One example of an SVG that is not this easy to use is the SVG image that opens as a series of line segments, rather than a closed outline. It can be used, but require a lot of clean-up and working with the nodes. In other words, more time and effort!
In preparing to create my applique, I decided to look at the "anatomy" of this design. In other words, I looked at each OBJECT to decide if I was going to use it as applique or embroidery.
The first object is the outline of the entire umbrella. This layer is at the very back of the design...the furthest from my hand if I were to reach and touch it. Adding fabric to this layer would add a stiffness to my applique, not necessarily desired. I think this layer is better served as embroidery embellishment.
The second object is one of the canopies. It is the layer that has the decorative edge. In paper crafting I would want to cut the whole thing (pasting all those circles is tedious!) In fabric crafting, I can add a similar embellishment with stitches. That means this object may go away!
The third object is the other canopy. It is simple and clean; I think it will cut beautifully on my Explore. This layer seems to lend itself to fabric applique. Sold! This will be the canopy to my umbrella!
Not wanting to use the second object, I decided to delete it. I decided to begin with the layer that would be furthest from my hand....essentially the background layer.
The only parts of this object that I want to use are the handle and the topper (circled). In my opinion, the best use of this layer is as guidelines for the column stitch (see arrows) This satin column will give some movement to the design and is fairly simple to place.
First, I made sure that I could see the sitches in my design. The "EYE" is gray---I'm good to go!
From the tools....
I selected COLUMN from the DRAW TOOLS. The COLUMN STITCH highlighted and I went to work.
To insert the COLUMN stitch, there is a rhythm. I understand it by thinking in terms of odd and even numbers when inserting the nodes. Node #1 is the first inserted. #2 is across the area from it. # 3 is on "the same side" as #1. In other words, all odd numbers lay on the same side; even opposite. I inserted nodes following the handle, up into the canopy area for a little overlap. Right click to set stitches.
The initial stitches...I have a handle! Now to adjust the BEZIER handles to get smooth curves and straight lines!
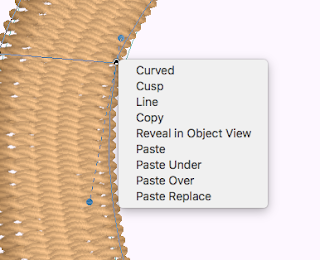
Look at the green number 1. I want to make this a straight area, rather than one with a bump. To do this I CLICK to select the NODE. It turns black.
Next, I right click to get the dropdown menu:

I select the appropriate action, which in this case was LINE.
Finally, I completed the knob at the top of the umbrella.
I like to organize as I go. So, I selected the handle and the knob and moved their position in the OBJECTS menu by dragging them to the selected spot.
To create the applique canopy is easy!
I selected the OBJECT (it is the outline--no stitches yet!)
After making sure the OBJECT was selected, I chose the STITCH TOOL > APPLIQUE to add the stitches.
Like magic! I have stitches! I adjusted the specifics of my applique:
BORDER : Blanket
FABRIC PREVIEW
POSITION
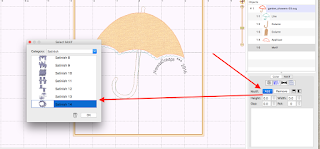
Almost done! I want to add a decorative border at the bottom of the canopy. I decided to use the DRAW WITH POINTS and MOTIF STITCH:
A new menu appears beneath the OBJECTS.
I want to ADD motifs to the design, so I select ADD.
Lo and behold---another window with a hugs selection of motifs.
I like the highlighted one, so I clicked OK.

I added points to the points (sorry!)
Right click to set.
And then, as before, I used the BEZIER handles to adjust the curves and lines.
I wanted the motif to be positioned more like the scallops on the original file. I selected the line and then used the green box to move the line to the bottom of the scallops. (You can see if you enlarge the picture!).
One more thing to clean up my applique: I deleted the green object LINE (position 1:1). I only used it for a guide in drawing the handle. It serves no useful purpose in this embroidery.

With a few custom touches and a little rearranging, I am done!
That was fun! Thanks for joining me on this adventure!
Until next time...


Thank you very much! I hope you continue doing tutorials. I'd love one last photo....a stitch out of your umbrella!!!
ReplyDeleteAnother gem of a tutorial! Thank you so much for taking the time to do this! I have tried some svgs and get hung up on the layers. This will help me so much! Thank you for sharing your process!!
ReplyDeleteLooking for importing or exporting of metal scraps, Zivmergers.com is well-known brand in scraps supply, & importing metal scraps - soft and hard Tungsten scrap to all over the globe with the quality delivery services
ReplyDeleteimport metal scraps