Silhouette Sunday: Celebrate

One thing that I really appreciate about my Silhouette is how well it plays with others, including other craft programs. One program that is just easier with the Silhouette is Kaleidescope Creator 3.

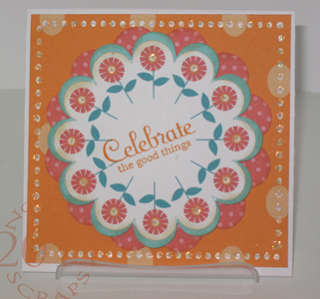
Kaleidescopes are big now! And combining KK3 with Silhouette makes them so easy! This happy card was created using KK3, my Silhouette and Lettering Delights graphics!

- Silhouette SD
- Silhouette Studio
- KK3 Software
- Letter Delights Banner Day, Banner Day Frames
- Cardstock: Georgia Pacific White
- White cardstock cut to 4.5 x 9" Fold for card base.
- Pop dots and assorted inks.
- Distress Inks: Antique Linen; orange
- Sentiment stamp of choice
- STickles
- Create each of "petal" shape layers in KK3, using select graphics from LD's Banner Day. Size to 4". Save as "Banner Day 1", "Banner Day 2" and "Banner Day 3."
- Create a background of 4.5." Fill with a frame from Banner Day Frames.
- Open each of the files created in step 1 Studio. Trace . Set cut lines to cut shape.
- Add Registration marks to paper; print.
- Cut, detecting registration marks.
- Assemble card front as shown. Stamp sentiment on top layer.
- Pop dot top two layers of design from largest "petal" shaped design.
- Using the glitter pen and pen holder, accent.
Enjoy! Until next time.....


Comments
Post a Comment