It's a Maker: Felt Flowers--take 2!
If you visited when I initially posted this, first, thank you! I thought I had a huge issue after Cricut Care contacted me about a Pink mat problem cutting these flowers. Wellll......I humbly apologize for any confusion. You see, it turned out to be operator error; but that is okay because I not know what NOT to do.
On to take 2!
As I was saying..... I don't know about you, but I'm starting to stockpile gifts for the holidays. Thanks to my Cricut Maker, this cute little pot of flowers can be done in a very little time!
Supplies needed:
Felt: (I used the pre-cut premium from Joann's--personal preference) two red and one green
3" Styrofoam balls: 1 per project
Clay flowerpot: 4" across top
Corsage pins (or long straight pins with a larger head)
Regular seamstress straight pins (without a colored head)
Optional glue
Cricut Maker with Rotary blade
Ribbon (optional)
my design space file linked here
1. Do not cut the Lettering File! Turn it off by clicking on the "eye" in the layers panel.
Note: From the materials list I selected "Felt".
I then lowered the pressure of the blade.
2. Cut all of the file pieces using the rotary blade. The wine layer, the pink layer and the red layer are cut from the red and will use both red pieces of felt. The green is cut from the green.
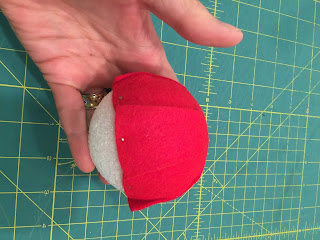
3. Cover the styrofoam ball with the large wine cut. To do this, place the cut piece on the ball, securing every other "wing" with a regular straight pin.
4. Finish covering the ball by securing the remaining four wings with the regular straight pins. You may need to overlap some of the felt; that is okay. Your styrofoam ball should now look like this:
5. Place the ball in the pot with the bare side down. You may choose to glue the ball into position to keep it from shifting while you arrange the petals.
6. Each of the blossoms will be completed in the same way. You will need a small blossom. a large blossom, and a leaf. I often only place the leaf on about half of my blossoms.
7. Layer the small blossom on the larger and insert a corsage pin through the center.
8. If using a leaf, continue through one point of the leaf, brining it under the blossoms. Assemble all blossoms.
9. To arrange the blossoms on the styrofoam base, begin with one blossom at the top. Push the entire pin into the styrofoam, securing the blossom.
10. To continue: Secure the next 3 blossoms as indicated by the corsage pins in the above photo. They form a triangle when looking down onto the project.
11. Finally, fill in the remaining blossoms, covering the styrofoam base.
I use my remaining leaves as fill for the bare spots. To attach the leaves I use the regular straight pins through one pointed end, pin to styrofoam base, and let the free point extend out of the blossoms!
Add a ribbon around the pot if you desire.
Here is a different color way in which I used jewelry findings rather than corsage pins. I also cut the petals in two different colors of felt.
Thanks for stopping by today and letting me share this little project with you! Until next time....
Keep sorting those scraps so that you can generate the gems!


Comments
Post a Comment