It's a Maker! Making a cute pumpkin even better with "Maizie" Maker.
I saw this blog post on a FB forum and fell in love with Stephanie Gerard's cute pumpkins!
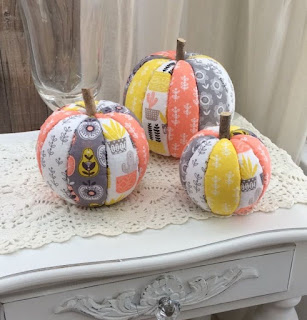
So, I rushed to make one from the great instructions on the blog. As I worked, I began to think that maybe, just maybe, "Maizie" Maker could make this so much more time efficient. And guess what -- she did!
Please understand, I am not "recreating" this pattern; it is not mine and I do not claim any rights to it. My instructions are only for expediting the cutting of the fabric on my Cricut Maker. Please refer to Stephanie's blog post in order to complete your pumpkins.
So, what is different? I decided that I needed a couple of things in addition to the supplies listed. These include:
- a tape measure
- a black sharpie marker
- a piece of computer paper (copy paper)
- Design Space software
- a DS file: (#M39484)s
- my Cricut Maker, "Maizie"

- I measured the circumference of my styrofoam ball.
- My 6" ball measured 18" around it's center

- I then divided the measurement in half.
- 18" circumference divided by 2 equals 9.
- I labeled this the LENGTH.
- Finally, I divided the 18" measurement by the number of sections I wanted my pumpkin to have.
- 8 sections sounded nice.....
- The 18" circumference divided by 8 equals 2.25.
- I labeled this WIDTH.
Now the fun part and why I love the flexibility of Design Space! I opened Design Space on my MacBook.


- First, I selected a new project...

- Then, I selected "images" from side bar...
- I am all for easy and DS's search engine is just the tool for that! At the top of my screen, I choset (1) CARTRIDGES and then (2) FILTER. From the drop down "filter" tab I ticked the box next to NEW.

- To be even more specific, I typed "FONT AND BASIC" in the address bar.

- Two choices popped up. The second choice (note the red arrow) was my exact match! It is the cartridge that contains my desired shape! So, I select it!

- Scrolling through the cartridge contents, I found this leaf shape.

One of the things I love about Cricut is the number of FREE shapes available for my use.
To be honest, I tried to reproduce this image with the shapes from the basic shapes, but was unsuccessful. It was a "duh" moment for me when I remembered all the extra shapes that are FREE! Total creativity at my fingertips....or search skills... but anyway, I digress.
As a reminder...what I am sharing is in addition to the carefully written directions in http://recycledcrafts.craftgossip.com/how-to-make-no-sew-fabric-pumpkins/2017/09/25/!
Please, review her directions and then the steps I have taken should make much more sense. I like to use my tools to their fullest and creating these files allow me to use my fantastic Maker to cut the necessary shapes, saving time and fabric!
I always start with basics. This leaf design helped me create the basic template from which I could create the entire design file. My plan was to create a paper template for marking the cut lines on my styrofoam ball and then the fabric wedges to be used in covering the styrofoam. So, on to the basic template....

Looking at the shape I decided to use only the "mat" or yellow part of this design. While in the Layers menu (the type is darker) I selected the green shape by clicking on it. I then, deleted that green shape. Voila! I had only my desired shape.
Time to "reshape" this design. I selected the SIZE LOCK and "unlocked" it so that I could change the length and width of my shape independent of one another.

It is time to use the calculations I completed earlier and logged in a note.
In the box labeled "W" I entered the WIDTH of 2.25.
In the box labeled "L" I entered the HEIGHT of 9.
Looks a little different, doesn't it?

This is my basic template shape. My plan is to cut it from copy paper and use the widest part to help me me mark the styrofoam ball for the cutting lines. But more about that later...
Time for me to size this template for my fabric wedges....
I selected the yellow wedge and then chose the EDIT menu. From the drop down I selected COPY and then PASTE. In my Design Space I now had a second yellow wedge!

To differentiate between the "template" and the "fabric" shapes I decided to change the color of the wedge that will be used for fabric. With the pasted wedge at the top of the layers menu selected, I clicked on its YELLOW circle. From the pop out menu, I chose the light orange.

In Design Space I try to use color coding as much as possible for my cut images, making it so much easier to efficiently cut my images! In this file, my paper cut will be the yellow image and my fabric cuts will be the others!
It was time for me to resize the orange (fabric) wedge. After a couple of failed attempts, I realized that I had to allow enough fabric to be tucked into the cuts on the styrofoam ball. An additional 1" seemed to work for me, but if you do not have a good sizing eye---add 1 1/2".

Using the same sizing technique as earlier, unlock the LOCK. Add one inch to the width (3.25) and and then to the length (10). And my fabric shape is done....or at least one of them is done.
But I need 8! Super easy, right? Using EDIT: COPY and EDIT: PASTE and the LARGER wedge, I copy and pasted 7 more sections for my total of 8.

Now it is the time to make this my own. Using the colored circle next to the layers, I recolored the fabric templates into 4 different colors. Now I can mat the correct fabric and cut two wedges at a time!

In order to know how much fabric to to cut I selected the MAKE IT button and the mat appeared, clearly showing the cut size of 7 x 11". So, I cut four pieces of fabric in preparation.

DS is set-up and ready to go! Following the on-screen prompts I cut my yellow wedge from copy paper and 8 fabric wedges from four different fabrics. Because I want to make more of this size, I marked the paper template with the corresponding styrofoam ball size. I won't have to cut another template until this one wears out!

On to prepare the styrofoam ball!
I placed the paper wedge on the ball, pinning it at the top and bottom (the v-shaped edge). I marked a cross shape at each end. This is the point around which I will rotate the paper template.

As I rotate the v-point around the top marking, I also drew lines at approximately the center of the ball to help me make the cut lines with the serrated knife.

I continued marking all the way around the styrofoam ball. My last section was not quite right, so I drew my last line in between the two previously drawn lines. (Note the line under the arrow).

I then followed the rest of the directions from
to complete my pumpkins!

Thanks for dropping by! Until next time.....

Comments
Post a Comment