Cricut Maker Meets Electric Quilt 8!
My "Maizie" Cricut Maker has met her new BFF, my Electric Quilt 8! Electric Quilt 8 (EQ 8) is a fantastic quilt design/layout program. And....it is for MAC or PC!
So, how do I use this program with my Cricut Maker? I was amazed at how easy it is. I think you will be as well. Just remember, the Cricut Maker is an electronic rotary cutter! And that is the "key!"
Let's take a basic block and see how this works.
A word of caution, EQ 8 does have a learning curve! It is not impossible, but it does take some time and effort to learn!
I was able to create this wall quilt, "Maizie's Path" in EQ 8 in minimal amount of time. The block is a standard EQ block, sized to 9". It can be rotary cut.

The functionality of the EQ program even calculates fabric yardage for me! But, the hidden gem is the ability to print rotary cutting directions. In the EQ 8 program it is pretty straight forward to find. Simply select the PRINT & EXPORT tab. Highlight the block desired (note the green outline). and select ROTARY CUTTING.

The EQ software calculates the exact measurements needed for the patches to make up the 9 " block.
I can set it up to show which patches are which.....

And it gives me the precise rotary cutting measurements for my 9" block! (Are you starting to see the trend here?) I just discovered that if I set my Preferences in EQ 8 to not round up the sizes I actually see the decimals needed for DS---sweet!)

And this is where EQ 8 meets my Maizie Maker! These directions can translate into Design Space files for cutting on my Maker! But first, I must open Design Space to a new project page.
PATCH A is pretty straight forward. It is a simple rectangle. From the TOOLS bar, I selected SHAPES and then the SQUARE. It will appear in black, I'll change that later!

To get the rectangle, I needed to adjust the width and the length of my square. The beauty of the EQ 8 directions is that they already include the seam allowance! It is just a matter of plugging in the dimensions. Let's do this!
1. Unlock (open) the LOCK in LOCK PROPORTIONS.
2. Type the HEIGHT in the HEIGHT box (2.750).
3. Type the WIDTH in the WIDTH box (9.5).

I have now created the correct size Patch A! I usually change the color to coordinate with the color scheme I created in EQ 8--makes cutting more efficient as well. In this case, I did change the color to a creme.

With the rectangle highlighted, from the Layers menu, I selected the small circle. The pop-out menu allowed me to select the color closest to my fabrics.
And on to Block B! This block actually yields two half-square triangles. I just love this little bit of DS magic!
Again, I selected SHAPES : SQUARE.
And I set the HEIGHT and WIDTH...
1. Lock (close) the LOCK in LOCK PROPORTIONS.
2. Type the HEIGHT in the HEIGHT box (3.104)
3. Tap ENTER on the keyboard (the WIDTH will set automatically since it is proportional!)
This is the part that makes me really happy! From the SHAPES TOOL I selected the SCORE LINE.

With the SCORE LINE still selected, I rotated it 45 degrees. To do this I TYPE 45 in the ROTATE box.

I then resized the selected SCORE LINE to the same size as the square (3.104 x 3.104).

I moved the line over the SQUARE. Now, I SELECTED both the line and the square. Finally, from the menu bar I chose SELECT : ALIGN : CENTER.

Are you waiting for the DS magic....it's coming! From the LAYERS menu, I highlighted the SCORE LIN, selecting it. Then I clicked on the image of the score tool.

From the pop-out menu, I selected the image for CUT, changing the score to a cut line.

This just makes me so happy! It is a CUT LINE! I can cut the two half square triangles! Amazing, right?

Finally, with the patch and the cut lines selected, I attached the lines to the shape by using the ATTACH tool at the bottom of the LAYERS MENU.

I just love this!!! It will be exact and I do not have to worry about measuring twice before I cut. These will be perfect half-square triangles. But I still need to create PATCH C.
PATCH C was created by EQ 8 so that it will yield quarter square triangles; you read correctly. The best part is that creating this patch is not much different than the last one.

Looking at Patch C, there are two ways to approach it. I can start from scratch following the basic steps for the half square triangles or I can use what I have! (Hey, I am all about saving time! DS is my ally here.) And it leaves more time to quilt. So, I am going to select PATCH B from the Layers menu and go from there!

With the patch and diagonal line highlighted, I chose EDIT : COPY from the menu bar.

Then, back to EDIT : PASTE.

Voila! A second PATCH B appeared on the on the DS page. But, I need it to be PATCH C! For this to happen, there are three things that must change. The first is the size.
With the second Patch B selected, I resized it proportionally to 5.057.
1. Lock (close) the LOCK in LOCK PROPORTIONS.
2. Type the HEIGHT in the HEIGHT box (5.707)
3. Tap ENTER on the keyboard (the WIDTH will set automatically since it is proportional!)

The second change is the addition and manipulation of a second diagonal cutting line--going to make an "x". I selected only the line of the resized patch from the layers menu. (Remember....it WAS a score line, but now will creates the diagonal cut.)

From the menu, I chose FLIP : HORIZONTAL. The second line should now be perpendicular to the first.

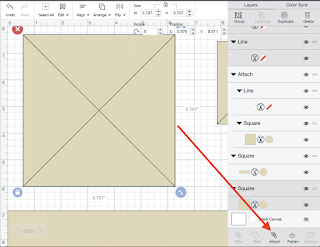
Now I selecedt the patch, the first diagonal line and the second diagonal line. place them correctly, I chose ALIGN : CENTER.

I am doing the happy dance here. Mazie Maker can now cut quarter square triangles sized exactly for the block created in EQ!
Before I go on....I actually "lost" one of my diagonal lines at this point. The fix was simple!

First, I highlighted the patch on the LAYERS MENU. I then selected ARRANGE and SEND TO BACK. There were my lines!
And I cannot forget to ATTACH the diagonal cutting lines to my patch! With the patch and diagonal cut lines selected, LAYERS MENU : ATTACH insures that they stay together!

Finally, I changed the color of PATCH C to coordinate with the colors from EQ 8.

Working in the LAYERS MENU, I selected the patch and the the SMALL CIRCLE to its right. I then chose a color that was close to my fabric choice.
All that is left is to save the file and then send it to Maizie so that she can do her magic! I seldom save more than one block to a file in DS. When I am ready to cut the fabric for the project I let DS lay the patches on the fabric. For multiples, I adjust my project copies to the number of patches my design needs. But....that is the magic of another day!
Until next time....don't stop sorting your scraps and creating your gems!


Comments
Post a Comment