My Sketch and My Craft room
Hi all! I am visiting on Bugbytes blog today. If you haven't found this wonderful place, come on over!
I have discovered the coolest app on my I Pad and I want to share it with you---as part of my craft room. Let me introduce you to “My Sketch” for I Phone and I pad. If you have an Android device, Pencil Sketch and Sketch Me are similar apps. The premise for all is similar: you either take a picture or use one from your library and then the app converts the photo into a sketch, beautifully. No further introduction, let's craft!

Download and install the correct app for your system.
Open the app.
I have discovered the coolest app on my I Pad and I want to share it with you---as part of my craft room. Let me introduce you to “My Sketch” for I Phone and I pad. If you have an Android device, Pencil Sketch and Sketch Me are similar apps. The premise for all is similar: you either take a picture or use one from your library and then the app converts the photo into a sketch, beautifully. No further introduction, let's craft!
Ingredients:
8.5 x 11" white card stock
Card base: 8.5" x 5.5"
A photo sketch app for your phone or computer
Make-the -Cut software
Lettering Delights Digital papers: Forget Me Not and Design Blues
IRock heat set tool and metallic brads
Distress Ink: Antique Photo
Assorted glues
Assorted embellishments
Zing
The steps:
Open the app.

I was then prompted to either take a photo or choose a photo from my library.

Okay, I'll admit that I already had a photo in mind! :-)

I cannot remember where this was obtained, but I love this scene!

This particular app prompted me to "set the sketch area," and choose what I wanted to sketch.

Next, I selected "Sketch photo." Wow! There are so many choices and types of sketch! I decided the Sepia Sketch was what I wanted....this time.

There are also two types of styles from which to choose, one is not as fine as the other. Both, are awesome! The app is so polite, it asked me to wait while it sketched my "beautiful photo." I could then adjust the photo to my exact likeness.

The "My Sketch" app then allows me to save in the best resolution for my purposes. Because I want to print and cut my picture I chose 100%. I also had numerous choices for the place I saved my sketch and I could even send this as a postcard! But I want to add this to a card for a friend recently diagnosed with cancer.

I can now take this into my Make the Cut software and use it as "Texture" to create my card.
I selected File: Import: Pixel Trace and located my image on my computer. Note the stars; with the name highlighted I chose open.

With Pixel Trace open I chose the following settings: Alpha 255, Threshold 255, Texturize path, Scale to size 3. 51 x 2.62". I selected Import and responded "No" to the pop-up window.

Because I do not want this square, I chose the rounded corner rectangle from the basic shapes menu. I stacked the two shapes. (Be sure that all shapes are on their own layer! (Notice the lower right corner of the picture.) The photo will be printed and the shape will be cut.

Using the features of Make the Cut, I then created the parts of my card. I chose to fill each shape with a "texture" from my Lettering Delights digital paper collections.

Again, I made sure that each object was placed on its own layer. Note the layer with the circled name. This is just a rectangular shape from the basic shapes. It is placed in this position because it holds the position of the print and cut marks in a stable position as I turn layers off and on for printing and cutting.

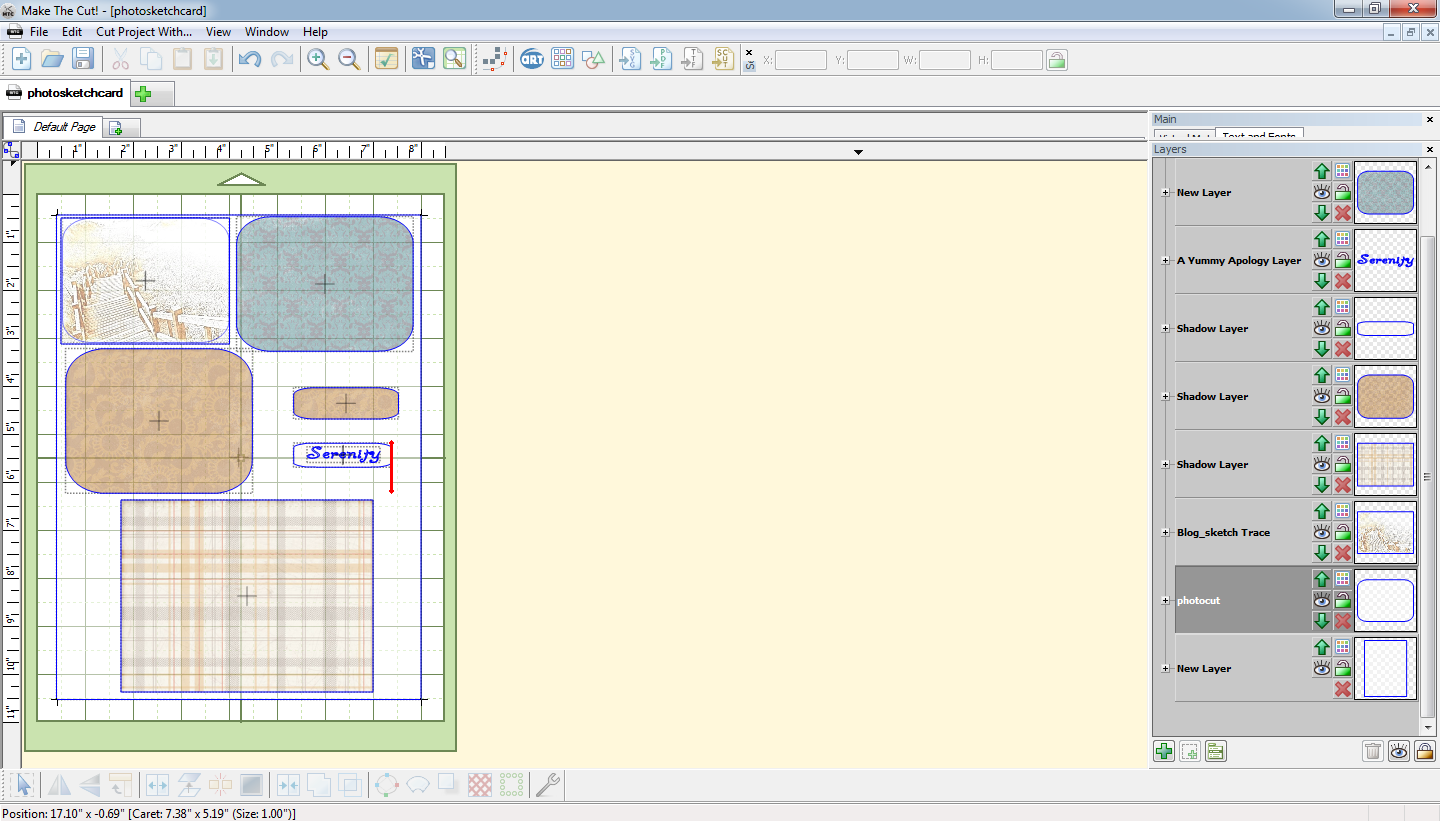 When it is all said and done, this is how my screen looked:
Before I send my printed copy to my home printer, I selected the layers marked by stars below:

I placed the printed sheet on my Zing mat and returned to my computer. I selected the layers marked by a star to send to my cutter:


steps of use
Setting up MTC/
Papers used: Forgetmenot (LD), design blues
Comments
Post a Comment