Sunday Surprise-fun foam stamps.
Surprise! I thought that I'd share a little of my latest passion. I have been playing with fun foam, MTC software and my Zing. All I can say is wow! I can't tell you what is coming, but this is addicting fun! Today, I'd like to share the basics of using regular Creatology fun foam (without the sticky back) to make your stamps.


Creatology Fun Foam
Xyron Creative Station with repositional adhesive
MTC software
basic shape of choice: to be used as digital stamp and cutting shape with foam
white cardstock
Pen holder (I used Amy Chomas' Mini Gel Pen holder for Silhouette)
Pen for sketch
Distress inks
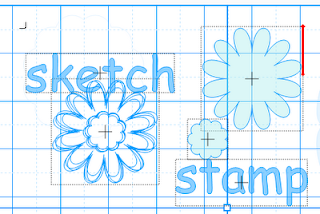
Set up your image in the software. Add a mat so that your image can be cut. The image is from Lettering Delights Basic Flowers.
Create a sketch outline from the basic shape. Move the mat to it's own layer. Duplicate the blue flower so that you have 6 images.

Set aside one of the images to be used later. Using the other 5 images, size and manipulate to create a "sketched effect."

Remember the shape you set aside? Select it, break the parts and separate them.

Vertical mirror the "stamp".

Set-up your machine to sketch the correct image. I use print and cut, but WYSIWYG will work as well if you set the blade origin for the sketch and 'use last' for the mat. Amy's pen holder is a little smaller than the Zing blade, so to correct the offset I added a layer of painter's tape. My settings for gel pen sketching: Speed 14, Force 10-12, offset 0.

Change to blade. Hide the sketch layer and cut the mat.

Set the mat/sketch aside. Set up foam for stamp. Run a 5" width of fun foam through the Xyron.
Remove the paper so that you only have the foam with the adhesive. Do not throw away the white backing paper (it can be used for storage!) Position on mat to correspond with position on virtual mat.

Set up your machine with a deep cut blade. My Zing cuts foam well with the blue blade, speed of 8-9 and pressure of 62, offset of .75. Cut 2 times.
Send the stamp to your cutting machine.

When shape has cut, very carefully remove excess foam.

Place parts on white backing until read to use.

When ready to stamp, place on clear block.

Ink as desired.

Stamp away!

Stamp center as desired.


Jeannie, I love your technique I have not yet cut foam with my zing but you have inspired me to try.
ReplyDeleteI wonder have you tried to emboss the foam with the other flowers for a negative sketch on the foam? Will the foam smoothly indent or drag? Will it maintain embossed lines? Just brainstorming here...
Thanks for the great tut!!
Laury
Love this technique! I am adding it to my "gotta try it" list. Thanks
ReplyDeleteNeat. I wondered if you couldn't do that with foam. Great work and thank you for testing it for me.
ReplyDelete