It's a Maker: Patchwork Square Patterns in Design Space
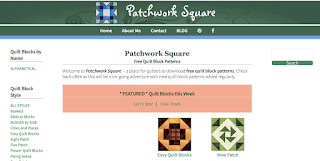
Did I tell you that Maizie Cricut Maker has a new BFF? Yup, and I have a new favorite quilting site! Without further adieu, let me introduce you to Patchwork Square:

Wendy has done an amazing job of offering numerous block patterns at a variety of skill levels. Her site is full of free PDF downloads for quilt blocks in various sizes. And the best part, her directions are clear and easy to follow. And, if I am at a loss as to layout, she includes suggestions! What more could one ask? How do I cut these with my Cricut Maker?
First, thank you, Wendy for permission to use your block! Let me introduce, Wendy's pattern: Bright Morning Star...
Pretty, huh? Say, if you would like to work along with me, please click here to link to the pattern page. Scroll down and you will find the downloadable PDF. Click on the picture of the pattern and save it to your hard drive.
Before I begin, I would like to point out a couple of pattern specific that make Wendy's patterns outstanding! They are also very helpful in Design Space.
The numbers are references to specific directions in her pattern. Sweet! No room for doubt as to which piece of fabric is cut for which patch! And, changing fabrics is simple, I just label the new fabrics with the appropriate number.
Cutting directions are equally clear! Located right next to the grid with specific cutting numbers for each fabric is the diagram box detailing how to cut specific shapes. I have paid great money for patterns did not clearly describe what to do! And folks, this is worth gold when using Design Space to create a cutting file for this block. You'll see why really soon....
Finally, Wendy included her patch cutting directions in an easy to find and read table, specific for each fabric. The numbers correspond to the labeled fabrics in the block. For example, let's look at the background fabric for the 12" block. Specifically stated, I am to cut 9 squares, three different ways: 4 simple squares, 4 squares bisected on one diagonal, and one square bisected on both diagonals. She lists this type of information for each fabric used.
But now the big question, how do I take these great instructions and make a beautiful block with my Cricut Maker, Maizie? In Design Space, of course!
I accessed Cricut Design Space on my computer and chose NEW PROJECT. With the new space opened I set out to create my squares for the background fabric. Here is how I translated Wendy's directions for a 12" finished block:
- Select the SHAPES tool from the toolbar.
- Choose the SQUARE shape. This is the only shape that I used in creating the squares for this particular block.
- I changed the size to the noted size of the block. Hmmm......Wendy's blocks are in fractions; DS notes in decimals. Not a show stopper!
I created this chart of decimal equivalents for the basic quilting fractions. You can download the PDF by clicking on the photo.
On to manipulating my DS square shape for 4 squares at 3 1/8".
With the black square selected, I clicked on the CIRCLE next to the square and CHANGED the color of the square to one more similar to the background fabric.
Next, I changed the size of the square. With the LOCK CLOSED, I typed in the size needed. According to the chart, 1/8" equals .125. With the LOCK engaged, type 3.125 into one box and press ENTER on the keyboard.
The directions state that I need four squares at this size. But, the directions also indicate that I will have two more sets of squares at the same color. So, I selected EDIT and then COPY and PASTE a total of 6 squares (I only picture five!) I will continue to work with only four at this size, so I moved the fifth and sixth squares off to the side.
I selected the 4 needed patches and chose GROUP from the LAYERS panel so that this set of four stays together.
Now to create the 2 7/8" squares.....
Four squares bisected on the diagonal....oh my!?!
Thanks, Wendy for the clarification! In Design Space, I chose one of the extra squares created in the previous step.
This square, however, needs to be sized to 2 7/8" or 2.875. With the LOCK engaged, type this measurement into one box and press ENTER on the keyboard.
Now to "bisect diagonally." You'll be so excited as to how easy this really is!
From the SHAPES menu, select the SCORE line (yes, you read right!) A dashed line appears in the space.
Move the line over the square for visibility purpose.
With the SCORE LINE selected, type 45 in the ROTATION box in the menu bar. The score line rotates to 45 degrees.
With the SCORE LINE still selected and the LOCK ENGAGED change the size to the EXACT SAME SIZE as the square (2.875).
Stay with me here, "bisect this square" means this square will be cut into two triangles. Therefore, I need to change the score line to a cut line. Ohhhh, DS, how I love your hidden talents!
From the LAYERS panel, select the CIRCLED SCORE TOOL (indicated by the arrow). A new window opens. Choose the CUT option (circled scissors). The line is no longer dashed, but instead becomes a solid line, a cut line!
With both the new CUT LINE and the 2.875" square selected, choose ALIGN from the menu bar and CENTER. The CUT LINE snaps directly over the square, bisecting it diagonally.
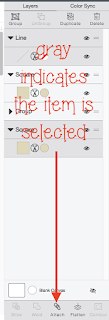
With the CUT LINE and the 2.875" SQ still selected, at the bottom of the LAYERS tab, choose ATTACH. Now, my Maker will cut 2 triangles from this square.
Since I need 4 squares like this, I COPY and PASTE for a total of 4!
SELECT all of these squares, GROUP (from the LAYERS menu), and move them to the side.
Whew! It is time to create the last BACKGROUND square with a set of repeats of the steps already done.
- Select the remaining square created in step one.
- With the LOCK engaged, change the size of the square to 5.25"
- Select the SCORE LINE. ROTATE 45 degrees and size to 5.25".
- Change the SCORE LINE to a CUT LINE.
- CENTER on the square
This square is bisected on both diagonals. One is done, the second is easy!
Select the diagonal CUT LINE. COPY and PASTE just the CUT LINE. With this line still selected,
choose FLIP and FLIP VERTICAL. Voila! A second diagonal cut line!
Position this line by SELECTing this BLOCK, all diagonal cut lines and choose ARRANGE: CENTER. Finally, with this square and lines selected, choose ATTACH from the LAYERS MENU to finish.
But what if the cut is a rectangle? The process is the same using the SQUARE. However, sizing is slightly different. For example:
After coloring the square, UNLOCK the sizing lock. It is necessary to independently type the width and the height in the boxes. The directions for this rectangle state a size of 1 7/8" x 3 1/8". Using the table, this translates into 1.875 x 3.125" Continue to copy and paste for four rectangles.
Last, but not least, I save this file as BrightMorningStar_12in in Designs Space. That way I'll always know which pattern I will use for construction or ideas!
That is it! The subsequent block squares, cut from the remaining fabrics (2-4) are created in the same way in DS! The best part is that when all squares are created, this block is can be precisely cut over and over again! No need to recreate, just multiply for your particular project.
Please note, these directions do not include drawn seam lines. The seam allowances are included in the sizing of each square. Wendy's directions state to use a 1/4" seam allowance. These directions do not include fabric yardage for this block. That is for another post!
My Cricut Maker, Maizie, wants to get busy on this project! So, I'm off to translate the remaining squares into Design Space so that she can get cutting! I hope that you are encouraged to do the same!
Until next time....


Comments
Post a Comment